I am bringing to you another Lemmon tested, Lemmon approved recipe. These pistachio cupcakes are some of the prettiest, tastiest cupcakes I've ever baked...and, even better, they are also some of the easiest.
Ingredients:
(2) 3.4 oz. boxes Jello pistachio pudding mix
1 box yellow cake mix (I used Duncan Hines)
1 cup heavy cream
2 1/2 cups cold milk (separated)
2 tsp vegetable oil
1/4 cup powdered sugar
Approximately 20-30 pistachios
Get started by preheating the oven to 325 degrees on a true convection bake setting (350 if you don't have convect bake.)
Cupcakes:
Whisk together 1 box pudding mix with 1 1/2 cups cold milk. Gradually add cake mix and whisk until completely blended. Add vegetable oil and mix thoroughly. Pour batter into lined cupcake tins. Fill each tin approximately 3/4 full. I was able to bake 15 cupcakes.
Bake for 20-25 minutes depending on your oven.
Frosting:
Whip together 1 cup heavy cream, 1 cup milk, 1 box pistachio pudding mix, and 1/4 cup powdered sugar until peaks form. Spoon frosting into gallon size Ziplock bag and refrigerate until ready to use. Chop pistachios and set aside until needed.
Wait for cupcakes to cool completely before frosting. Snip corner of Ziplock bag and pipe frosting onto cupcakes. Sprinkle chopped nuts onto the top of each cupcake. Refrigerate any leftovers.
These cupcakes are great for company because they look and taste a lot more time consuming than they really are. Enjoy!
Pages
Visit My Company Website - Spiral Digital Media
Showing posts with label recipe. Show all posts
Sunday, June 3, 2012
Sunday, May 6, 2012
Super Easy Homemade Donuts Recipe
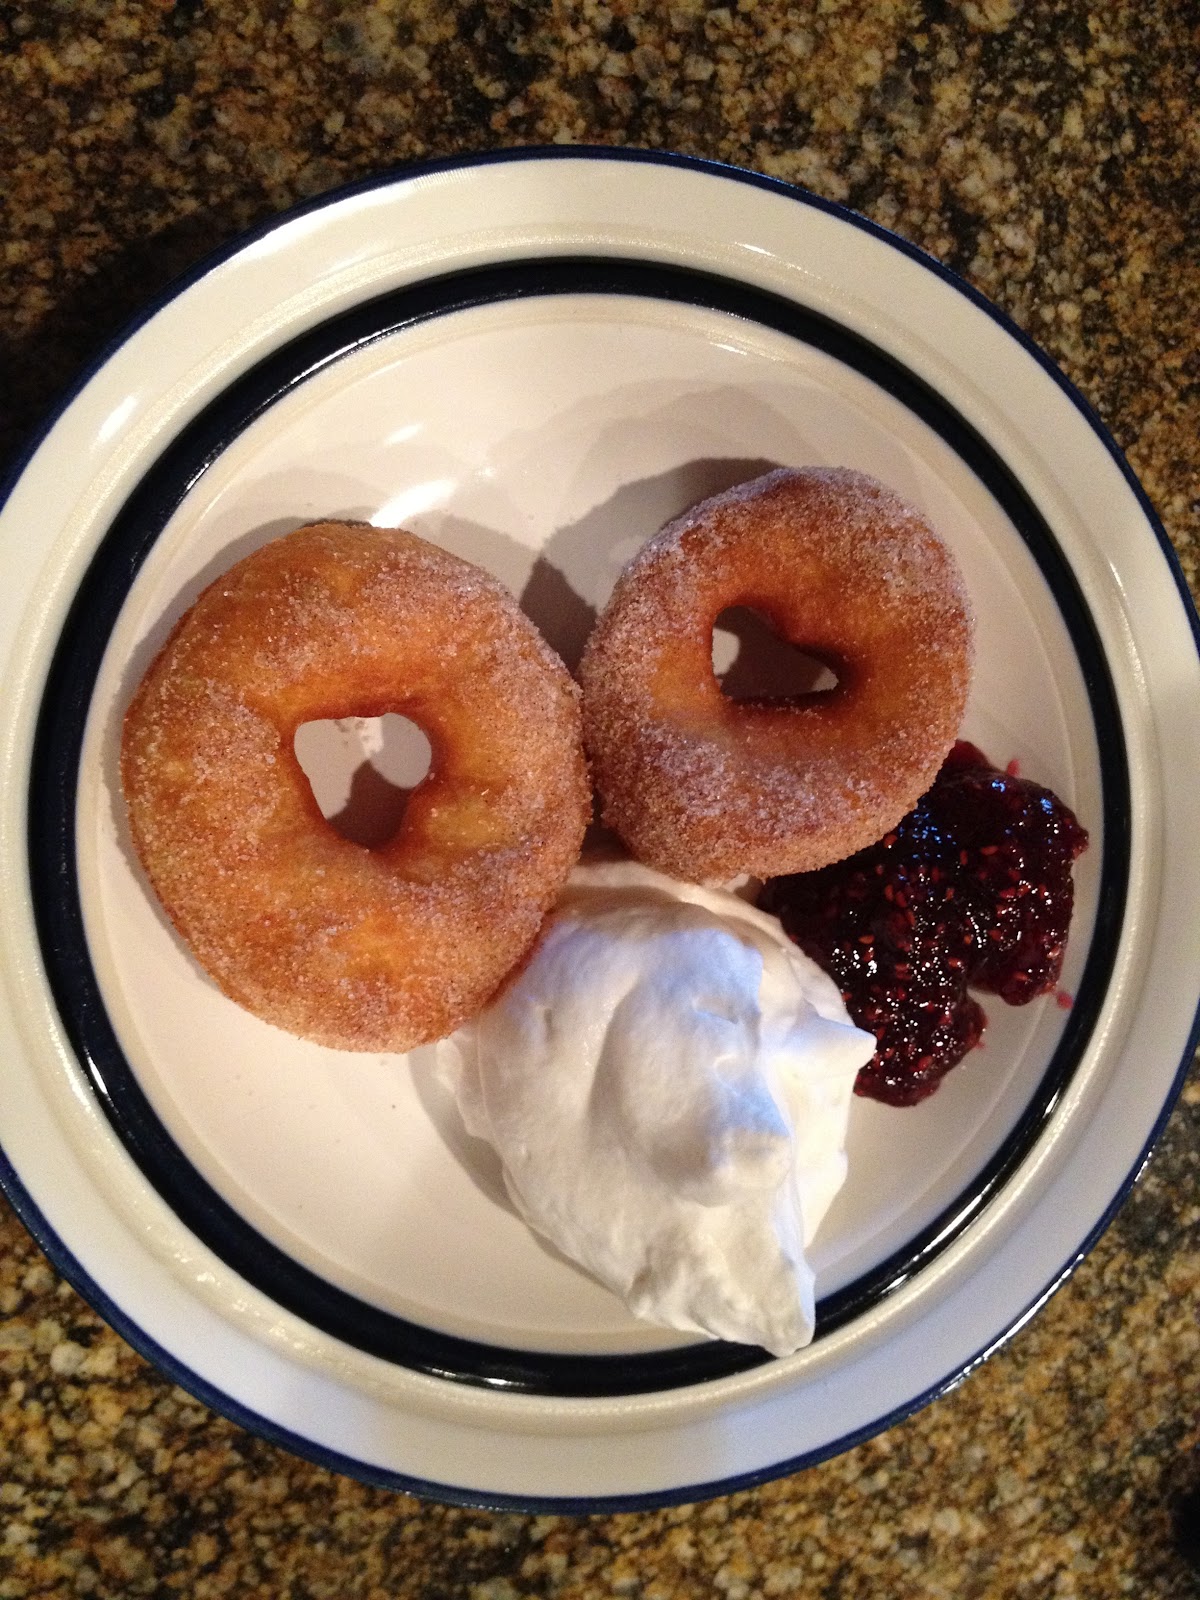
Tonight I had not planned very well for Sunday dinner. So we were left dessertless and wondering what we could whip up with what we had on hand. I ended up making homemade donuts with whipped cream and raspberry preserves to dip in...and they were amazing! AND amazingly easy...which is my kind of recipe.
Here's what you need:
For Donuts:
1 can refrigerated biscuit dough
vegetable oil (for frying)
cinnamon
sugar
For Whipped Cream:
whipping cream
powdered sugar (confectioner's sugar)
vanilla extract
I used a deep fryer to cook the donuts, but you could just as easily heat 2 inches of oil in a cast iron skillet and it would work great. While my oil was coming to temperature (350 degrees is ideal) I took each biscuit out of the can and cut a hole in the middle using a Christmas cookie cutter I had lying around. (Happened to be in the shape of a heart, which made the donuts look really cute!) As soon as the oil is hot enough, just drop the donuts in. Let them cook to golden brown on one side (just about 2 minutes in the oil) and then use tongs to flip them over. Cook the other side to golden brown as well. Have a paper plate with paper towels ready to soak up the grease and bring the donuts right from the oil onto the paper plate. I had a bowl all ready with cinnamon and sugar mixed together and immediately after draining the donuts I rolled them in the cinnamon sugar mixture. They came out perfectly and it was ridiculously easy!
For the whipped cream, I simply take one small carton of whipping cream, add what I think is the appropriate amount of sugar, plus about one teaspoon vanilla and whip on a high setting in my stand mixer for a while. (By the way, you can just as easily use regular, granulated sugar for whipped cream. I did this today because I was out of powdered sugar. Tastes the same, you just have to whip it a little longer.) When the cream starts to form peaks I check the sweetness and add more sugar if needed before continuing to whip it until it is perfect. I served each plate of donuts with a big dollop of the whipped cream and a spoonful of raspberry preserves. Oh my...I could gain a bit of weight on this recipe. Easy, delicious and fattening. Dangerous. Very dangerous.
Wednesday, May 2, 2012
Chili Lime Glazed Shrimp Recipe
This is my second addition to the "Lemmon tested - Lemmon approved" Pinterest recipe log. I see so many recipes that look great on Pinterest, but not all of them end up being yummy. So I've started a list for you of recipes that I have found on Pinterest, tested, and found to be full of lovely deliciousness! Of course, in many (OK most) cases I've changed the recipes from their original form...sometimes a little, sometimes a lot. Also, as I've noted before, I tend to cook by adding a little of this and a little of that. I almost never measure anything unless I'm baking. So, sometimes my recipes can be a little vague. But that allows you to experiment as well...to adjust things to your own taste. The fact is that great cooking isn't rocket science! It's personal. It's finding your own perfect balance of flavors. I am trying to measure a little though for recipes that I know I will be posting on the blog.
So here's what I made tonight...Chile Lime Glazed Shrimp.
It was yummy. Really yummy. I did not have a single shrimp remaining. My boys loved it as did my hubby. The baby was not interested in trying it. But, then again, she isn't interested in much if it isn't shaped like Dora or covered in chocolate.
Here are the ingredients:
1 1/2 - 2 lbs of shrimp...deveined, peeled, tails off. I bought a big bag of frozen shrimp (with coupons) and thawed them overnight in the fridge. Then I made the marinade and as I peeled each shrimp I dropped it in the marinade bowl. That way I only had to marinate them for 15 minutes in the fridge after I finished peeling them and they were great.
Juice from 2 limes
2 Tbsp light virgin olive oil (you could substitute almost any light flavored oil here)1 1/2 inch squeeze of diced Garlic in the tube (or 2-3 cloves if you dice it yourself)
1 1/2 inch squeeze of Ginger in the tube (1 tsp crushed fresh ginger)
3 Tbsp brown sugar (lightly packed)
1 tsp salt
1 tsp smoked paprika (very approximate...a little more...a little less)1 tsp Mesquite seasoning (or you could use almost anything else that sounds good)
1 tsp cayenne pepper flakes (again, subjective)
Mix all the ingredients together in a bowl and drop shrimp in. Marinate for at least 15 minutes but up to an hour. Heat a small amount of olive oil in a saute pan over medium heat. Saute shrimp for a couple minutes on each side...just enough to cook to opacity and get a nice glaze on each side.
That's it! Super easy and I promise you the sweet, hot crunch will bring you back for more!
Wednesday, April 25, 2012
Watermelon Salsa Recipe
I come across a lot of recipes on Pinterest and lots of them look really good. Unfortunately, not all of them taste really good. So I've decided to start posting the ones that do (or the ones that do with a bit of alteration) onto my own blog. You can be confident that any recipe you read on my blog has been tested in the Lemmon kitchen and found to be delicious.
The latest recipe to emerge from the Lemmon test kitchen is watermelon salsa. I found the original recipe on Pinterest and it was very exact. All the ingredients were measured in spoonfuls and quarters of cups. I'm not good at that. I like to be more approximate...which is probably to say that I'm just lazy.
At any rate, here's my rewritten watermelon salsa recipe (which, by the way, turned out absolutely great!)
1/4 of a seedless watermelon diced into cubes
1/2 of a cucumber, peeled, seeded and diced into smaller pieces then the watermelon
1/2 to 1 jalapeno pepper (depending on how hot you like it) seeded and diced into very small pieces
1/2 of a red bell pepper seeded and diced into pieces the same size as the cucumber
1/3 of an onion diced
6 basil leaves finely chopped
4 mint leaves very finely chopped
1/4 of a bunch of cilantro chopped (about 1/3 cup)
the juice from one lime
a good, long squeeze of honey (about 2 tbspns worth)
a couple shakes of salt
Stir all the ingredients together and let them sit covered in the fridge for at least 2-3 hours.
This salsa is amazing. I thought it sounded good, but it was even better than it sounded.
Monday, April 9, 2012
Frozen Yogurt Pops (and Baby Steps to Healthier Eating)
Like many moms, I avidly read through the Pinterest tales of moms who no longer server their families any processed food products. I ooh and ahh over the bread that they make from scratch. I ogle the photos of neatly laid out Bento boxes full of healthy school lunches...each one packed with a loving note from mom. These women are super heroes. And I say that with genuine admiration and no bitterness what-so-ever. OK...only the tiniest hint of bitterness.
But it HAS gotten me thinking. My family does consume a lot of pre-packaged, over processed foods. Certainly more than I would like. This is due, primarily, to two factors: 1. I am a couponer, and processed foods go on sale with coupons more often than healthy foods. So I buy them because I have two boys who eat more food in a day then I do in a week. And cheap food keeps me from having to live in a cardboard box. 2. My boys are often desirous of a snack at a time that I am not available to fix them a lovely, healthy snack. So I get stuff for them that is quick and easy and that they can serve themselves.
So what hope is there for me... the budget conscious, full time working, over taxed mother? Well...there's got to be SOMETHING I can do. So, I have adopted a strategy that works well for me in other areas of my life...the baby step approach. I am trying to change our eating habits in baby steps...one thing at a time. It doesn't seem nearly so daunting that way.
So far, I've done two things. 1. I've replaced the bread I normally buy at the store (which was already 100% wheat...but was very processed and full of preservatives) with bread purchased weekly at our local Great Harvest Bread Co. Now, their bread is EXPENSIVE...which rubs the coupon queen in me the wrong way. However, I have made the point to purchase only day old or two day old bread. This saves me 25% or 50% respectively and brings my total extra expenditure on bread to only about $10 per month. I can handle that. And with a bread clip placed tightly at the neck, the bread still lasts a week or more.
2. I've started making yogurt pops on Saturdays. They are incredibly simple to make and my boys love them for snacks. I was inspired to do this after I bought my Popsicle molds at IKEA. If you don't already have some, CLICK HERE to get the great IKEA version for $1.99! Last Saturday, my 2 year old and I assembled the pops. 2 blueberries on the bottom, spoonful of fruit yogurt, 2 blueberries, another spoonful, etc. We had a great time, and the results were delicious. One thing that I might change next time...the blueberries are quite tart, and yogurt is already tart (especially when frozen.) So I'm thinking of macerating the blueberries for a while in simple syrup next time before I drop them in the pops. I know, I know...more sugar. But still homemade and you gotta make it taste great right?
I will begin compiling my simple steps as a sidebar to the blog. Happy eating!
Thursday, March 15, 2012
Puddin' Head - But Not Frosting
We had guests over tonight visiting from Salt Lake City and I wanted to throw together some treats for everyone after dinner. I put a pan of brownies in the oven (made from a mix...because who makes brownies from scratch? I love making things from scratch...but brownies are luscious just as they are...from the Duncan Hines box.) So, anyway, my brownies are baking in the oven and I want to put something on top that will make them just a little special. I'm racking my brain when I remember a recipe I had seen a few weeks ago on Pinterest and been meaning to try. It was touted as the "only frosting you will ever make again."
Ingredients:
One small box instant pudding mix in your choice of flavor (I went with Cookies and Cream)
One cup of milk
One small container of Cool Whip (or about 2/3 of a large container)
I didn't have the Cool Whip in the house so I ran to the store and came back. I still had time to whip up the frosting before the brownies were done. As promised, it was ridiculously easy. First whisk your cup of milk into the instant pudding. Then fold in your Cool Whip and...you're done! I didn't even defrost the Cool Whip (obviously) and with a little extra stirring it was still a great consistency. I spooned my Puddin' Head into a gallon size Zip Lock baggie, cut off the tip and piped the Puddin' Head onto the brownies.
Now I will admit that I think labeling this as a "frosting" is a bit of a stretch. It's more like a flavored whipped cream. However, given that I am one of those people that thinks frosting is almost universally too thick and too sweet, I can see using this concoction in place of frosting in virtually any application that would traditionally call for frosting. It will not, however, work on items that you do not intend to consume immediately as it will melt. So, instead of calling it frosting, I call it Puddin' Head.
Now that I've told you what it isn't, let me tell you what it is...DELICIOUS! So good that my husband licked the bowl, and my friends said that it made the brownies "so much better." "Normally," said my girlfriend, "I don't like frosting on brownies because it is just sweet on sweet, but this made the brownies better...so light and fluffy, they just slid right down." Music to my ears!
Needless to say, I will be trying this again...next time with a different flavor...maybe pistachio!
Ingredients:
One small box instant pudding mix in your choice of flavor (I went with Cookies and Cream)
One cup of milk
One small container of Cool Whip (or about 2/3 of a large container)
I didn't have the Cool Whip in the house so I ran to the store and came back. I still had time to whip up the frosting before the brownies were done. As promised, it was ridiculously easy. First whisk your cup of milk into the instant pudding. Then fold in your Cool Whip and...you're done! I didn't even defrost the Cool Whip (obviously) and with a little extra stirring it was still a great consistency. I spooned my Puddin' Head into a gallon size Zip Lock baggie, cut off the tip and piped the Puddin' Head onto the brownies.
Now I will admit that I think labeling this as a "frosting" is a bit of a stretch. It's more like a flavored whipped cream. However, given that I am one of those people that thinks frosting is almost universally too thick and too sweet, I can see using this concoction in place of frosting in virtually any application that would traditionally call for frosting. It will not, however, work on items that you do not intend to consume immediately as it will melt. So, instead of calling it frosting, I call it Puddin' Head.
Now that I've told you what it isn't, let me tell you what it is...DELICIOUS! So good that my husband licked the bowl, and my friends said that it made the brownies "so much better." "Normally," said my girlfriend, "I don't like frosting on brownies because it is just sweet on sweet, but this made the brownies better...so light and fluffy, they just slid right down." Music to my ears!
Needless to say, I will be trying this again...next time with a different flavor...maybe pistachio!
Subscribe to:
Posts (Atom)